Resell tools
Addresses, proxy groups, inventory, sales, expenses and profit: everything after the order arrives.
Addresses
Resell ops → Addresses breaks your orders down by delivery address, so you can see which ones stick and which ones retailers cancel.
- Each address shows its orders, delivered and canceled counts and its stick rate.
- Filter by retailer and by period to see how an address does at one store.
- Add a label (a name and a start date, for example when you began using a new batch of addresses). Selecting it shows only the orders since that date, so you can judge a fresh batch on its own.
Group jigs into houses
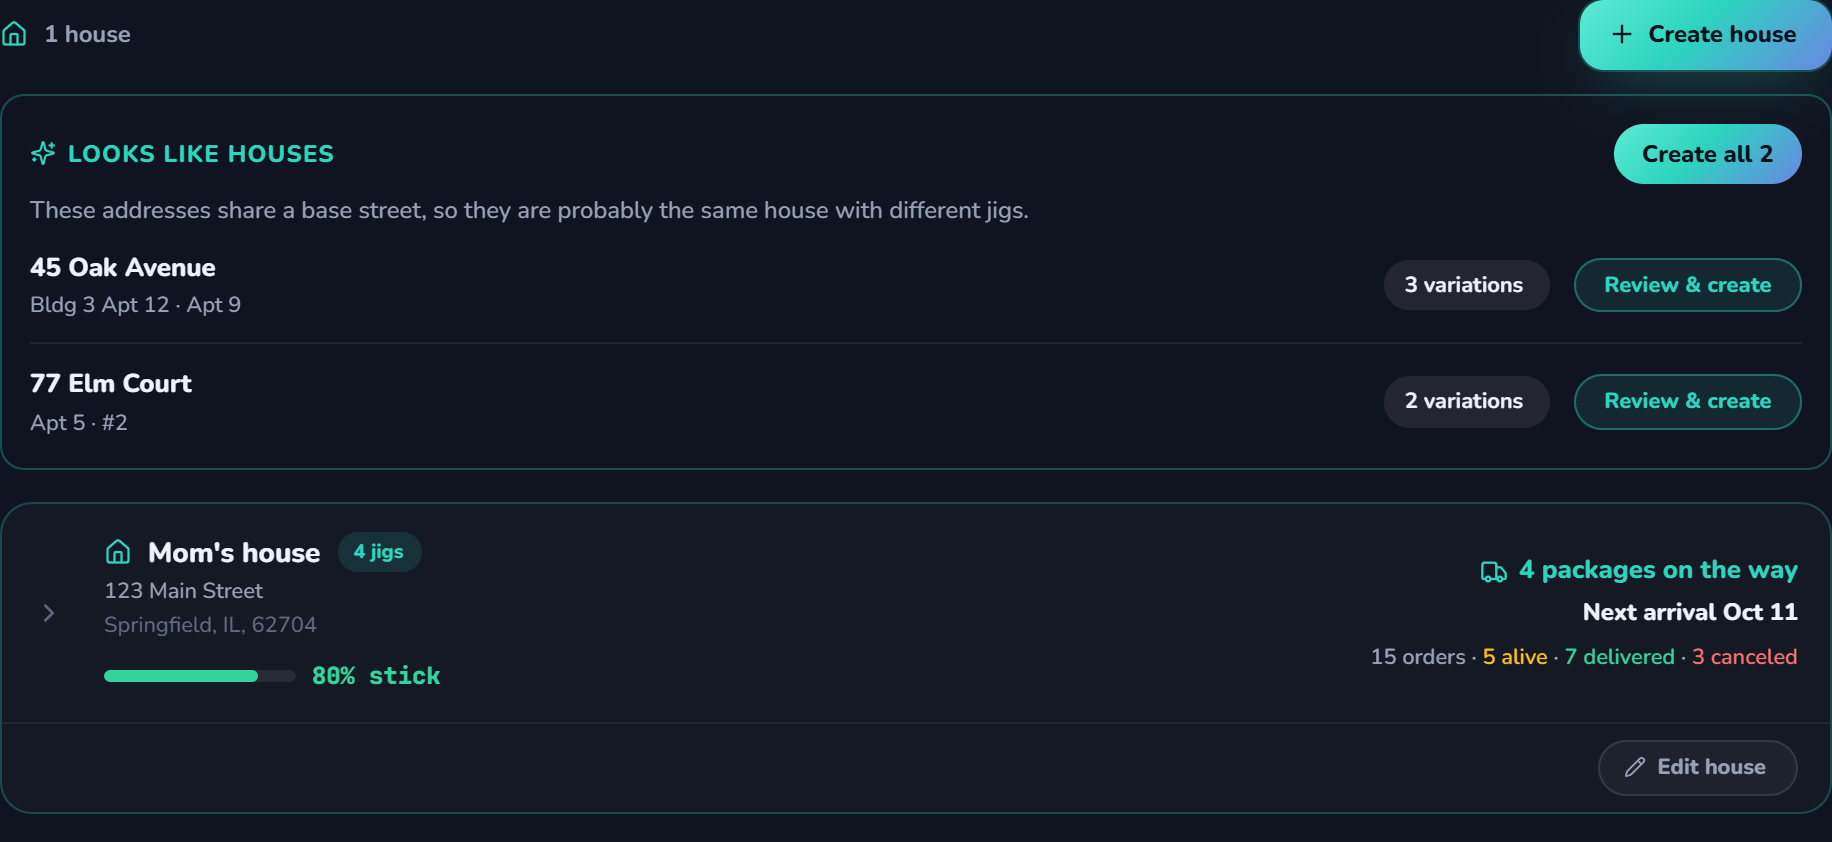
A house is one base address plus every jig (address variation) that delivers there. Instead of a row for each variation, you get one card per house, with its orders and all its jigs underneath.
- 1Press Create house
On the Addresses page, in the Cards view (the default).
- 2Type the base address
For example
123 Main Street. Add a name if you like, such as Mom's house. - 3Tick the jigs that belong to it
Press Select matching to tick every variation on that street. Apartment and unit numbers are ignored, and "Street" counts the same as "St". Add any others by hand.
- 4Save
New jigs on the same base street join the house on their own later. One you take out stays out.
 Create a houseMake them allCheck one firstArrivals
Let orderpilot find them
Addresses that look like one house are suggested in a box called Looks like houses. Press Review & create to check one first, or Create all to make a house for every suggestion in one click. Deleting a house is always safe: your orders and addresses stay.
What a house shows
- Packages on the way, the next arrival date, and orders · alive · delivered · canceled, plus the combined stick rate.
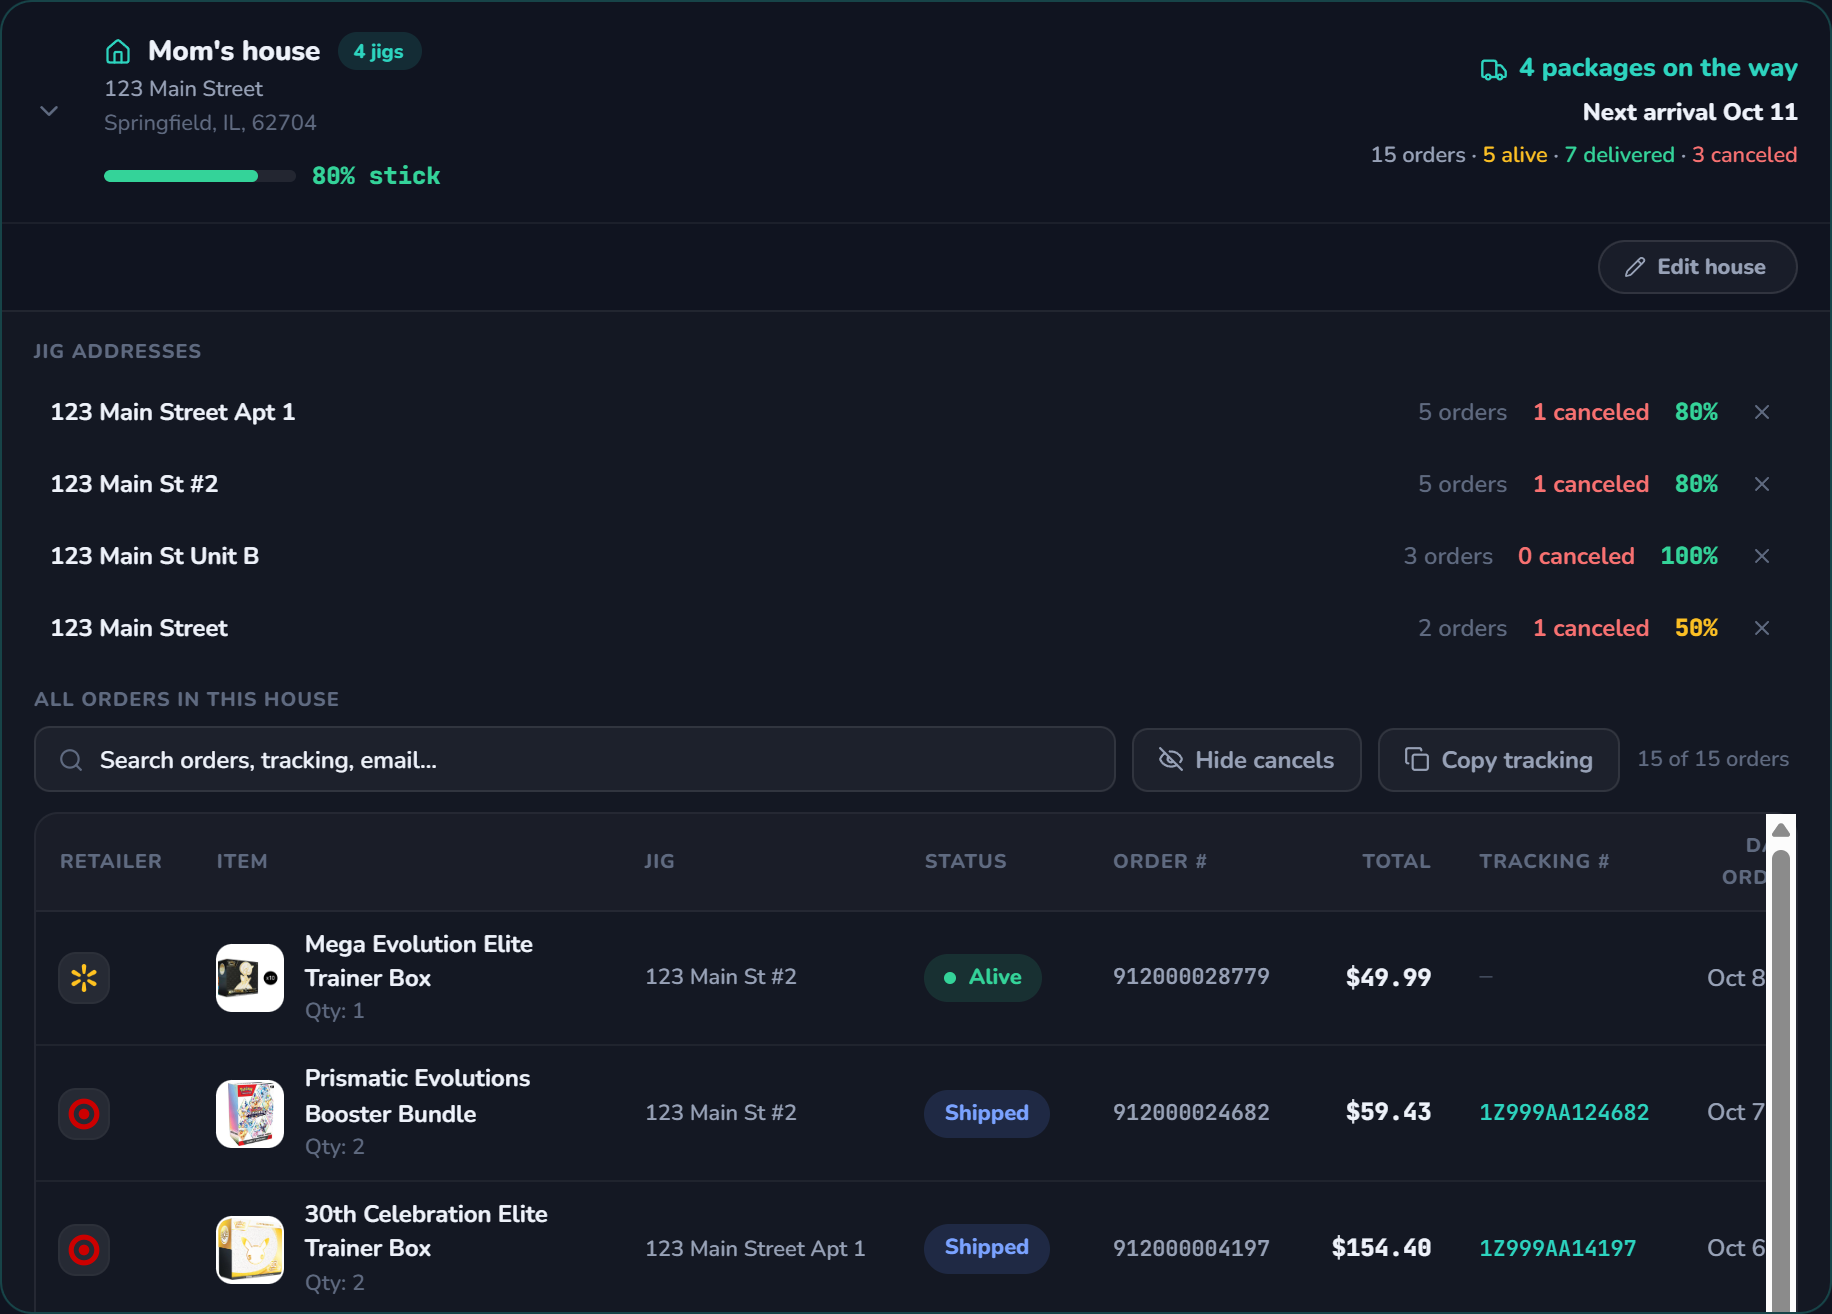
- Open a card to see each jig's own numbers, and below them all the orders in a table: retailer, item, jig, status, order #, total, tracking and date. The tracking numbers are links.
- Click a jig to show only that address's orders. Click it again, or press Show all jigs, to see everything.
- The table has a search box, Hide cancels, Copy tracking (copies every tracking number in view) and date sorting.
- The x next to a jig takes it out of the house. Edit house changes the name, base address or jigs, or deletes the house.
- An address that is not in a house has an Add to house menu. The Table view lists every single address with the same numbers.
 Edit or deleteClick a jig to filterCancels · tracking
Target's 5-day limit
Target rejects a 3rd or later order to the same address within any 5-day span. That is a rate limit, not the address being flagged. A switch on the page decides how to count those orders:
- On — the extra orders are left out of the address's stats entirely.
- Off — they count like any other order, so hitting the limit drags the stick rate down.
The count always uses all your orders, regardless of the filters you have set.
Proxy groups
Your bot posts a webhook to Discord every time it checks out, fails, or gets canceled, and each one shows the proxy it used. orderpilot reads those and tells you which proxy group is actually doing best: not just which one the bot called a success, but which ones stuck (were not canceled later).
Set it up (2 minutes)
- 1Copy your Discord webhook
In Discord, open the channel your bot posts checkouts to, then Edit Channel → Integrations → Webhooks, and copy the webhook URL.
- 2Make your orderpilot link
Open Proxy groups in the sidebar, paste the webhook, and press Make my link.
- 3Put the link in your bot
In your bot's settings (Shikari, Stellar and others), replace the Discord webhook with your orderpilot link. Your Discord looks exactly the same: every message still arrives unchanged.
- 4Press Send test
A test message appears in your channel, so you know the link works.
What you see
 Paste this in your botCheck it worksBest group so farRename or combineStuck = kept
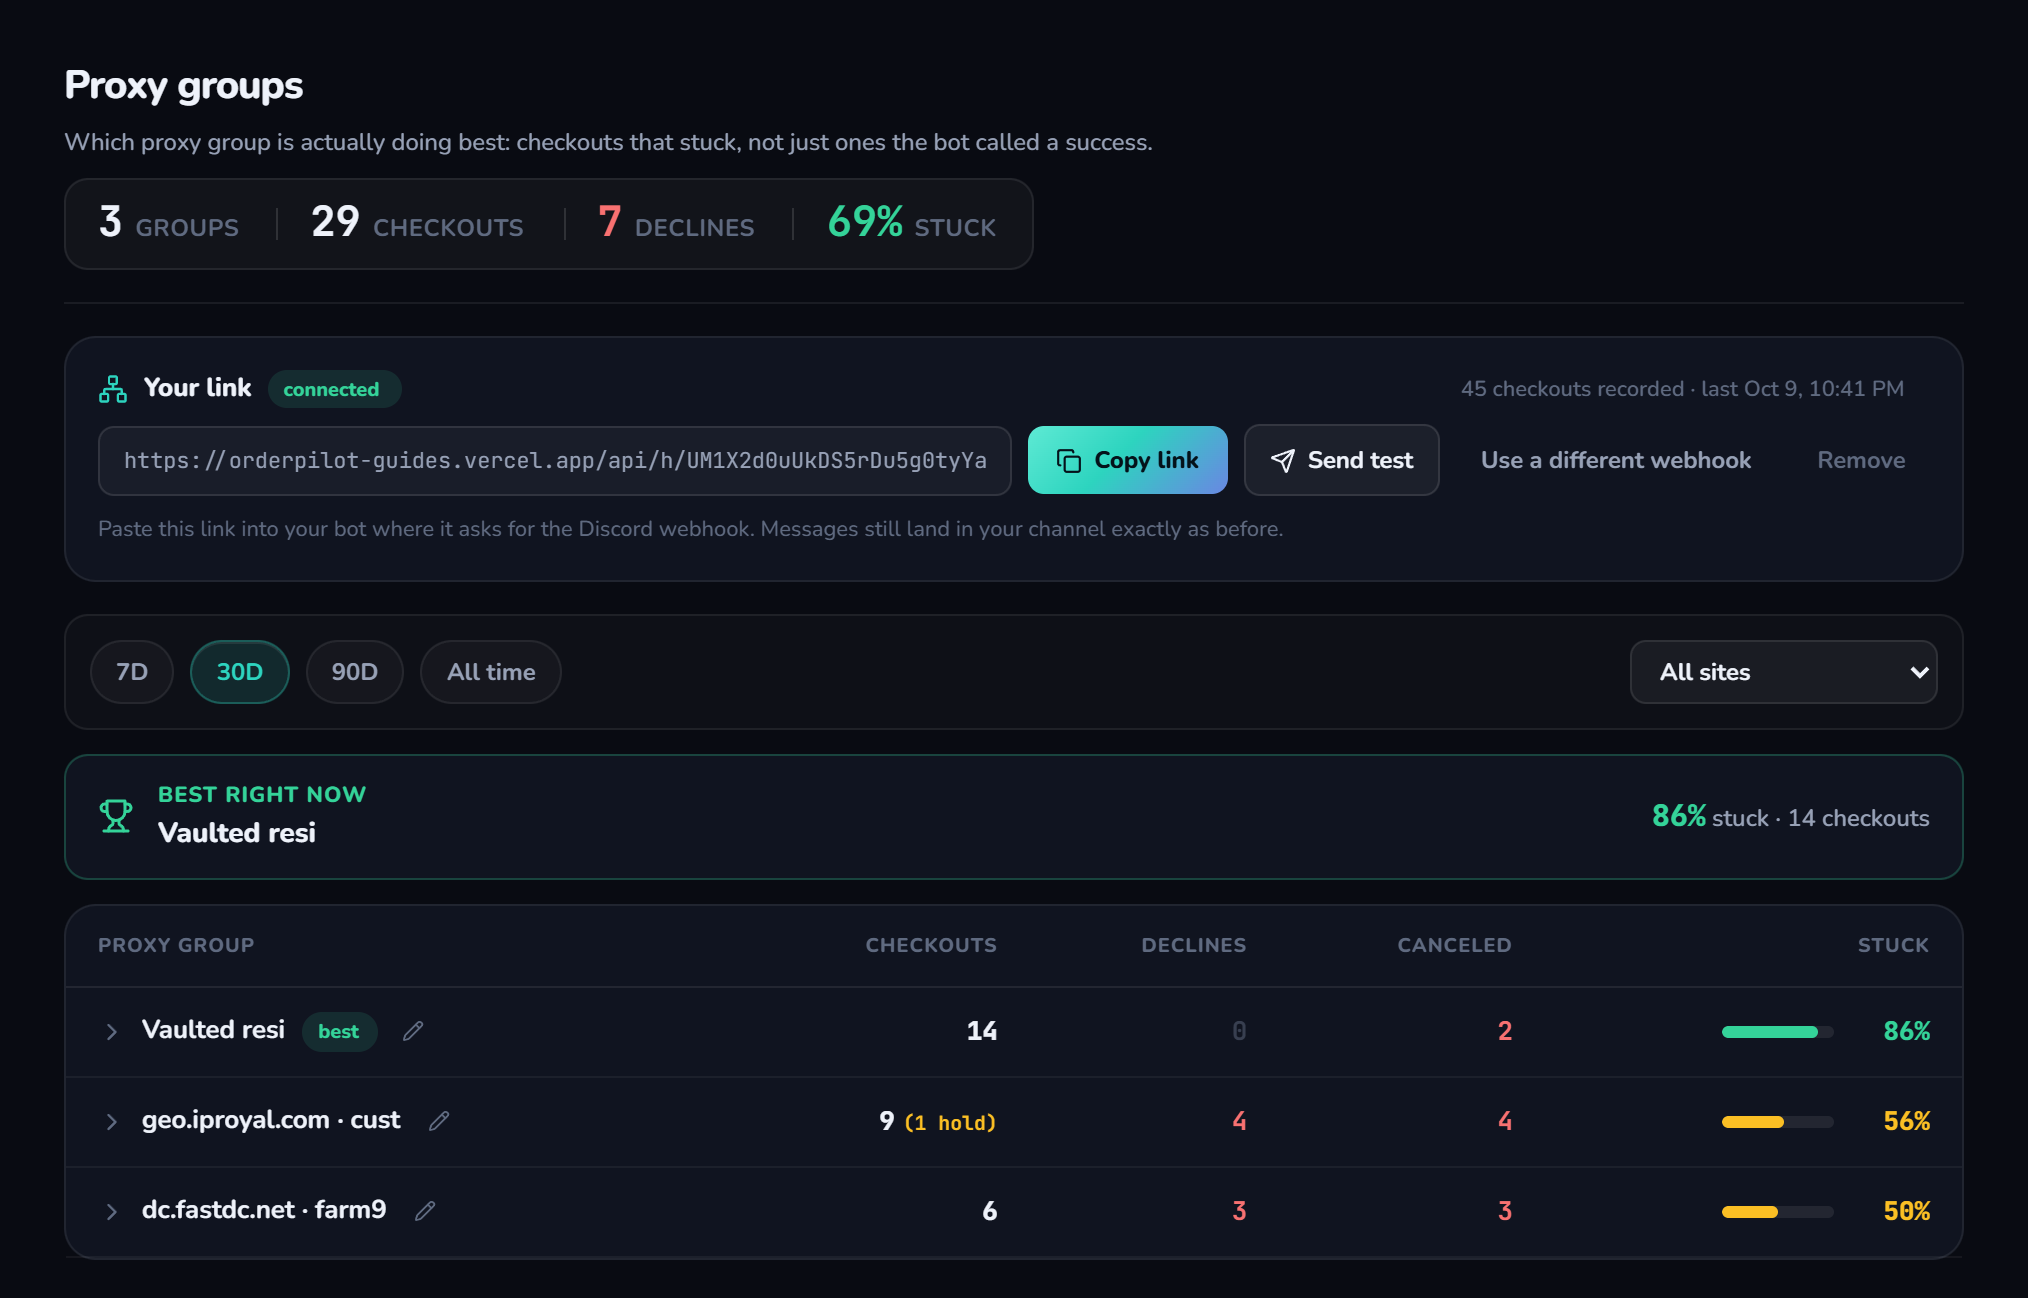
- Each proxy group with its checkouts, declines, canceled and stuck rate. The best group is highlighted once it has at least 5 checkouts; groups with fewer sort below the others.
- Stuck is the number that matters: checkouts that were not canceled afterwards. A group can look great in the bot and still lose most of its orders to cancels.
- Open a group to see how it does on each site (Target, Walmart, Pokémon Center…) and why its orders were canceled (like Item Demand).
- Groups are named after the proxy provider and login. Press the pencil to rename one, or give two groups the same name to combine them.
- Cancels come from your bot's cancel messages and from your order emails. The order number in each webhook is matched to the real order orderpilot read from your inbox.
- Filter by the last 7, 30 or 90 days, or by site. Latest webhooks at the bottom shows exactly what came through, so you can check it is being read correctly.
What orderpilot keeps
Only the site, product, quantity, order number, profile name, and the proxy's provider and login name. It never keeps account emails, proxy passwords or session ids. Your Discord webhook is sealed inside the link and is not stored on its own.
Remove the link any time and change the webhook back in your bot to go straight to Discord again.
Inventory
Every order you buy lands in Inventory automatically, so you always know what you hold and what it is worth.
Reading the page
- In stock — delivered units.
- On the way — ordered but not delivered yet.
- Cost each — what you paid per unit, from your orders.
- Stock value and Unrealized — what your stock is worth at current market prices, and how far that is above or below cost.
Market prices
Prices come from TCGplayer's public data. Press Refresh prices to update them. If a product is matched to the wrong listing, use Link to a TCGplayer product, search for the right one and pick it.
Add and edit
- Add a product by hand: name, quantity and cost each.
- Edit or delete any row.
- Import CSV and Export CSV move your inventory in and out.
Sales
Resell ops → Sales is your sales ledger.
Log a sale
- 1Press Log a sale
- 2Start typing the product
Pick it from your inventory and its cost fills in automatically.
- 3Fill in the money
Sale price, fees, what you paid for shipping, quantity, date sold, and the platform: eBay, TCGplayer, Whatnot, Mercari, StockX, Facebook, Local or Other.
- 4Save
Reading the totals
| Tile | Meaning |
|---|---|
| Revenue | What buyers paid, before fees |
| Cost basis | What you paid for the units sold |
| Fees / shipping | Marketplace fees and your shipping cost |
| Profit | Revenue minus cost, fees and shipping |
| Margin | Profit divided by revenue |
Use the period picker and search to look at a month or one product. Import CSV and Export CSV are in the toolbar.
You do not have to type every sale: Sale scan reads them from your email.
Sale scan
Resell ops → Sale scan reads your inboxes for marketplace sale confirmations (eBay and Mercari) and adds them to Sales.
- 1Choose the inboxes
The ones that receive your marketplace emails.
- 2Choose the marketplaces and how far back to look
- 3Start the scan
New sales appear in Sales when it finishes.
- Sales are keyed by marketplace order number, so scanning again never doubles anything up.
- A close match with an inventory product name fills in the cost for you.
- eBay's fee is not in the email, so it is estimated (13.25% + $0.30). Edit the sale once your payout arrives.
Expenses
Resell ops → Expenses is where everything that is not stock goes, so Profit is honest.
- Add an expense with an amount, date, category, vendor and note.
- Categories: Shipping supplies, Software & bots, Proxies & servers, Memberships, Storage, Fees, Travel, Other.
- Mark an expense monthly and it repeats on the same day every month.
- The summary shows total spent, your biggest category and your recurring cost per month.
- Import CSV and Export CSV are in the toolbar.
Profit
Resell ops → Profit adds up your Sales and Expenses.
| Number | How it is worked out |
|---|---|
| Revenue | Sale prices in the period |
| Fees + shipping | What went to marketplaces and carriers |
| Net profit | Revenue minus cost of goods, fees, shipping and expenses |
| Margin | Net profit divided by revenue |
| Stock value / Unrealized | What your inventory is worth now, and how far above cost it is |
- Month by month shows net profit as a chart.
- Top products shows what earned the most.
- Change the period at the top to compare months.